GitHub代码:HttpUtil.java
摘要:本文介绍在项目中用HttpClient来发送HTTP请求时,对HtttpClient进行的封装,使得我们在项目中使用HttpClient时可以更简单易用。
Maven项目中的pom.xml
添加HttpClient依赖
1 | <dependency> |
HttpUtil.java
实现了对HttpClient的封装,代码如下
1 | package com.csh.util.http; |
GitHub代码:HttpUtil.java
摘要:本文介绍在项目中用HttpClient来发送HTTP请求时,对HtttpClient进行的封装,使得我们在项目中使用HttpClient时可以更简单易用。
添加HttpClient依赖
1 | <dependency> |
实现了对HttpClient的封装,代码如下
1 | package com.csh.util.http; |
摘要:前面几篇文章简单介绍了Thrift的基本知识和小案例。接下来这篇文章讲述在项目中使用Thrift框架作为RPC通信的时候,如何去封装Thrift,使我们在项目中使用的时候可以更简单易用。文中的代码不一定是真的项目应用中的代码,只是写了一个粗糙的例子,提供一个封装思想。
目标 :从前面的文章的几个例子可以看出,我们在调用一个接口的一个方法的时候,需要写多几行代码来设置RPC通信的信息,而我们调用本地的某个类的一个方法的时候,我们只需要2行代码就可以了,比如:1
2HelloService helloService = new HelloService();
helloService.sayHello();
我们肯定是希望在使用Thrift作为RPC通信的时候,不管是Server端还是Client端,都可以像上面调用本地方法一样,只需要2行代码就搞定。带着这个目的,我们通过下面的代码来实现它。
使用手段 :当我想到希望不管在Server端还是Client端,都用2行代码来实现Thrift调用的时候,我想到了Spring的AOP,我觉得跟它很相似,首先我们在调用一个方法的时候,需要设置一大堆东西,执行完方法的时候,又要把通讯关掉,这很符合AOP面向切面编程的思维。我们可以通过AOP把除了执行业务的代码给封装掉,让使用的时候只需要new一个对象然后就可以调用它的方法。AOP是用动态代理实现的,而动态代理跟反射息息相关。这个案例可以让我们重新回顾一下这些知识点。
HelloService.thrift1
2
3
4
5
6
7namespace java com.thrift.demo.service
service HelloService {
i32 sayInt(1:i32 param)
string sayString(1:string param)
bool sayBoolean(1:bool param)
void sayVoid()
}
TestService.thrift1
2
3
4
5
6
7
8
9
10
11
12
13
14
15
16
17
18
19
20
21
22struct Test {
1: required bool bool_; //required 必须填充也必须序列化
2: optional i8 i8_; //optional 不填充则不序列化
3: i16 i16_;
4: i32 i32_;
5: i64 i64_;
6: double double_;
7: string string_;
8: binary binary_;
}
service TestService {
void getVoid(1:Test test);
bool getBool(1:Test test);
i8 getI8(1:Test test);
i16 getI16(1:Test test);
i32 getI32(1:Test test);
i64 getI64(1:Test test);
double getDouble(1:Test test);
string getString(1:Test test);
binary getBinary(1:Test test);
}
ThriftProxy.java1
2
3
4
5
6
7
8
9
10
11
12
13
14
15
16
17
18
19
20
21
22
23
24
25
26
27
28
29
30
31
32
33
34
35
36
37
38
39
40
41
42
43
44
45
46
47
48
49public class ThriftProxy implements InvocationHandler {
//Client类
private Class clientClass;
//Service类
private Class classs;
private String[] hostPorts;
public Object newInstance(Class classs, String[] hostPorts) {
try {
this.clientClass = Class.forName(classs.getName() + "$Client");
} catch (ClassNotFoundException e) {
e.printStackTrace();
}
this.classs = classs;
this.hostPorts = hostPorts;
return Proxy.newProxyInstance(clientClass.getClassLoader(), clientClass.getInterfaces(), this);
}
@Override
public Object invoke(Object obj, Method method, Object[] objs) throws Throwable {
if (null != hostPorts && hostPorts.length > 0) {
for (String hostPort : hostPorts) {
if (null != hostPort && "" != hostPort.trim()) {
TSocket socket = null;
try {
int index = hostPort.indexOf(":");
String host = hostPort.substring(0, index);
String port = hostPort.substring(index+1, hostPort.length());
socket = new TSocket(host, Integer.valueOf(port));
TProtocol tProtocol = new TBinaryProtocol(socket);
TMultiplexedProtocol multiplexedProtocol = new TMultiplexedProtocol(tProtocol, classs.getSimpleName());
Class[] classes = new Class[]{TProtocol.class};
socket.open();
return method.invoke(clientClass.getConstructor(classes).newInstance(multiplexedProtocol), objs);
} finally {
if (null != socket) {
socket.close();
}
}
}
}
}
return null;
}
}
ThriftProxyFactory.java1
2
3
4
5
6
7
8public class ThriftProxyFactory {
public static Object newInstance(Class classT, String[] hostPorts) {
ThriftProxy thriftProxy = new ThriftProxy();
return thriftProxy.newInstance(classT, hostPorts);
}
}
ThriftServer.java1
2
3
4
5
6
7
8
9
10
11
12
13
14
15
16
17
18
19
20
21
22
23
24
25
26
27
28
29
30
31
32
33
34
35
36
37
38
39
40
41
42
43
44public class ThriftServer {
public static void start(Class[] classes, String localhost, int port) {
//classes HelloServiceImpl.class
try {
Pattern pattern = Pattern.compile("^(.+)\\$Iface$");
Matcher matcher = null;
TServerSocket serverTransport = new TServerSocket(port);
Factory protocolFactory = new TBinaryProtocol.Factory();
TMultiplexedProcessor processors = new TMultiplexedProcessor();
for (int i=0; i<classes.length; i++) {
Class<?> classT = classes[i]; // classT HelloServiceImpl.class
Class<?>[] interfaces = classT.getInterfaces();
for (Class<?> interfacez : interfaces) { // interfacez HelloService.Iface
String interfacezName = interfacez.getName();
matcher = pattern.matcher(interfacezName);
if (matcher.find()) {
String classTName = matcher.group(1); //classTName HelloService
Object classTObject = Class.forName(classTName).newInstance(); //classTObject HelloService
Class iface = Class.forName(classTName + "$Iface");
Object object = classT.newInstance();
TProcessor processor = (TProcessor) Class.forName(classTName + "$Processor")
.getDeclaredConstructor(iface)
.newInstance(object);
processors.registerProcessor(classTObject.getClass().getSimpleName(), processor);
}
}
}
TThreadPoolServer.Args args = new TThreadPoolServer.Args(serverTransport);
args.protocolFactory(protocolFactory);
args.processor(processors);
args.minWorkerThreads(1000);
args.maxWorkerThreads(1000);
TServer server = new TThreadPoolServer(args);
System.out.println("开启thrift服务器,监听端口:9090");
server.serve();
} catch (Exception e) {
e.printStackTrace();
}
}
}
Server端启动1
2
3public static void startServer() {
ThriftServer.start(new Class[]{HelloServiceImpl.class, TestServiceImpl.class}, "localhost", 9090);
}
Client端启动
1 | public static void startClient() throws TException { |
我们可以看出,Server端只需要ThriftServer.start(xxx)就可以将Thrift Server启动起来,而Client端也像在调用本地方法一样可以通过2行代码就实现调用远程接口的方法。
摘要:本文简单写一个Thrift支持多接口的代码
Thrift通过TMultiplexedProcessor来设置多个服务接口
下面是代码:
1 | namespace java com.thrift.demo.service |
1 | struct Test { |
1 | public class HelloServiceImpl implements HelloService.Iface { |
1 | public class TestServiceImpl implements TestService.Iface { |
1 | public class ThriftServer { |
1 | public class ThriftClient { |
Server端:
开启thrift服务器,监听端口:9090
TestServiceImpl.getBool() + true
TestServiceImpl.getDouble() + 5.0
say string :哈哈哈
Client端:
Received 1
Client getBool()true
Received 2
Client getDouble()5.0
Received 1
HelloService sayString :哈哈哈
通过这个方法,就可以在启动一个服务中同时提供多个接口给客户端调用,这种方式在项目开发中可能会用的更多。
参考文章:
Thrift对多接口服务的支持
摘要:本文介绍Thrift几个Server,以及其代码的实现。
Thrift为服务器端提供了多种工作模式,本文中将涉及以下5中工作模式:TSimpleServer、TNonblockingServer、THsHaServer、TThreadPoolServer、TThreadedSelectorServer,这5中工作模式的详细工作原理如下:
TSimpleServer的工作模式只有一个工作线程,循环监听新请求的到来并完成对请求的处理,它只是在简单的演示时候使用,它的工作方式如下图所示:
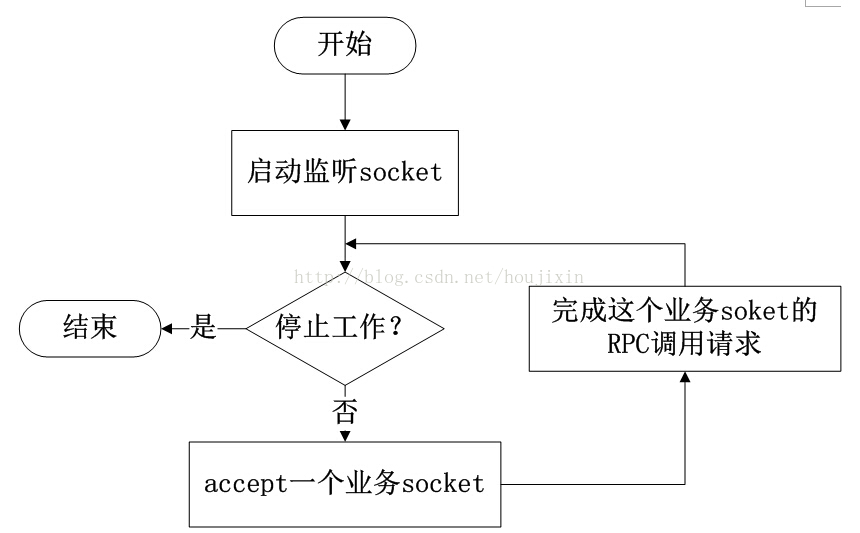
TSimpleServer的工作模式采用最简单的阻塞IO,实现方法简洁明了,便于理解,但是一次只能接收和处理一个socket连接,效率比较低,主要用于演示Thrift的工作过程,在实际开发过程中很少用到它。
上篇博客已经有了
Thrift 简单例子
TNonblockingServer工作模式,该模式也是单线程工作,但是该模式采用NIO的方式,所有的socket都被注册到selector中,在一个线程中通过seletor循环监控所有的socket,每次selector结束时,处理所有的处于就绪状态的socket,对于有数据到来的socket进行数据读取操作,对于有数据发送的socket则进行数据发送,对于监听socket则产生一个新业务socket并将其注册到selector中,如下图所示:
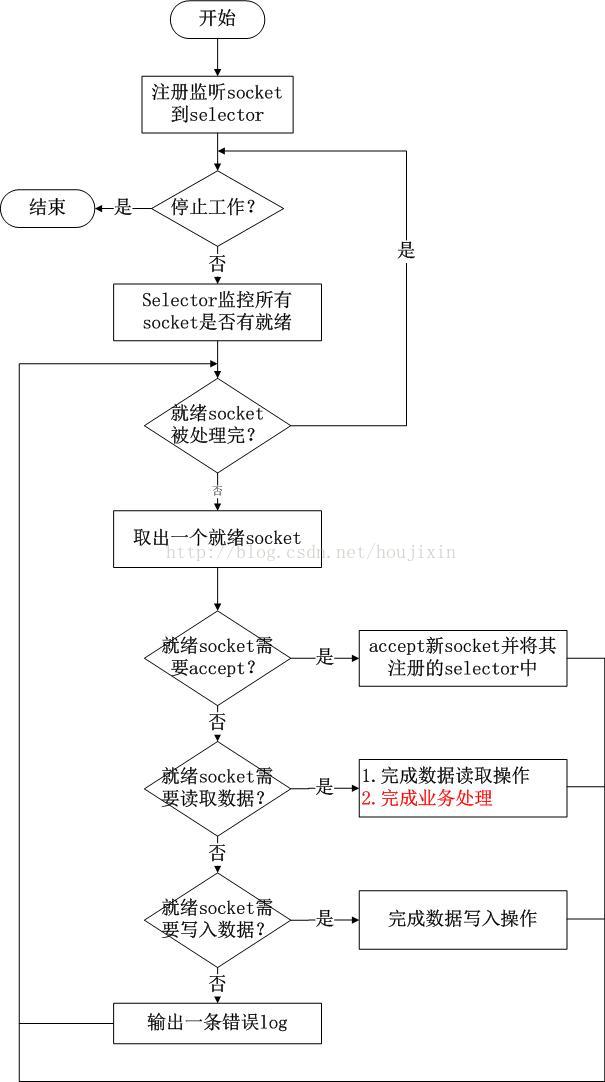
上图中读取数据之后的业务处理就是根据读取到的调用请求,调用具体函数完成处理,只有完成函数处理才能进行后续的操作;
相比于TSimpleServer效率提升主要体现在IO多路复用上,TNonblockingServer采用非阻塞IO,同时监控多个socket的状态变化;
TNonblockingServer模式在业务处理上还是采用单线程顺序来完成,在业务处理比较复杂、耗时的时候,例如某些接口函数需要读取数据库执行时间较长,此时该模式效率也不高,因为多个调用请求任务依然是顺序一个接一个执行。
Server端:1
2
3
4
5
6
7
8
9
10
11
12
13
14
15
16
17
18
19
20
21
22
23public class ThriftServer {
public static void main(String[] args) {
try {
// 设置服务器端口
TNonblockingServerSocket serverTransport = new TNonblockingServerSocket(9090);
// 设置二进制协议工厂
Factory protocolFactory = new TBinaryProtocol.Factory();
// 处理器关联业务实现
Processor<TestService.Iface> processor = new TestService.Processor<TestService.Iface>(
new TestServiceImpl());
TNonblockingServer.Args args = new TNonblockingServer.Args(serverTransport)
.processor(processor)
.protocolFactory(protocolFactory);
TServer server = new TNonblockingServer(args);
System.out.println("开启thrift服务器,监听端口:9090");
server.serve();
} catch (TTransportException e) {
e.printStackTrace();
}
}
}
Client端:1
2
3
4
5
6
7
8
9
10
11
12
13
14
15
16
17
18
19
20
21
22
23
24
25
26
27
28
29
30
31
32
33
34
35
36
37
38public class ThriftClient {
public static void main(String[] args) {
try {
TProtocolFactory protocolFactory = new TBinaryProtocol.Factory();
TAsyncClientManager clientManager = new TAsyncClientManager();
TNonblockingSocket transport = new TNonblockingSocket("localhost", 9090);
TestService.AsyncClient client = new TestService.AsyncClient(protocolFactory, clientManager, transport);
Test test = new Test();
test.setBool_(true);
test.setI8_((byte) 1);
test.setI16_((short) 2);
test.setI32_(3);
test.setI64_(4L);
test.setDouble_(5.0);
test.setString_("abc");
test.setBinary_("abc".getBytes());
CountDownLatch latch = new CountDownLatch(1);
client.getBool(test, new AsynCallback(latch));
boolean wait;
try {
wait = latch.await(1, TimeUnit.SECONDS);
System.out.println("latch.await =:" + wait);
} catch (InterruptedException e) {
e.printStackTrace();
}
transport.close();
} catch (IOException e) {
e.printStackTrace();
} catch (TException e) {
e.printStackTrace();
}
}
}
运行结果:
Client端:
Received 0
onComplete
AsynCall result =:true
latch.await =:true
Server端:
开启thrift服务器,监听端口:9090
TestServiceImpl.getBool() + true
THsHaServer类是TNonblockingServer类的子类,在TNonblockingServer模式中,采用一个线程来完成对所有socket的监听和业务处理,造成了效率的低下,THsHaServer模式的引入则是部分解决了这些问题。THsHaServer模式中,引入一个线程池来专门进行业务处理,如下图所示;
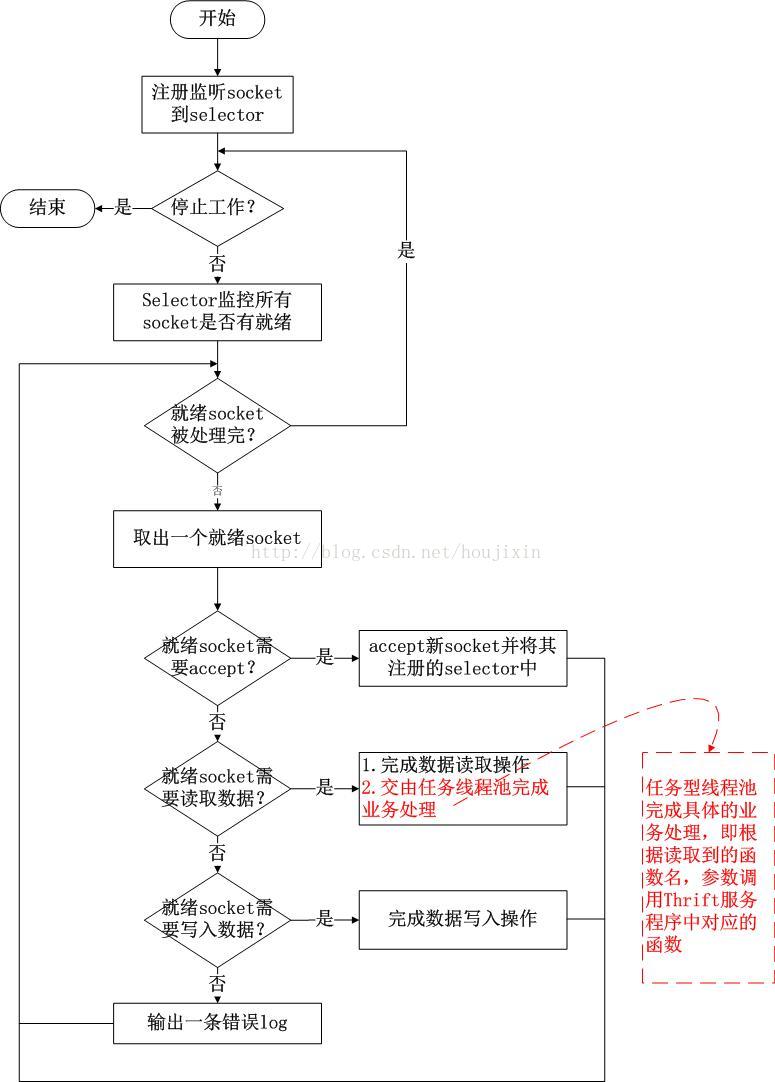
与TNonblockingServer模式相比,THsHaServer在完成数据读取之后,将业务处理过程交由一个线程池来完成,主线程直接返回进行下一次循环操作,效率大大提升;
由上图可以看出,主线程需要完成对所有socket的监听以及数据读写的工作,当并发请求数较大时,且发送数据量较多时,监听socket上新连接请求不能被及时接受。
Server端:1
2
3
4
5
6
7
8
9
10
11
12
13
14
15
16
17
18
19
20public class ThriftServer {
public static void main(String[] args) {
try {
TNonblockingServerSocket serverTransport = new TNonblockingServerSocket(9090);
TTransportFactory transportFactory = new TFramedTransport.Factory();
Factory protocolFactory = new TBinaryProtocol.Factory();
Processor<TestService.Iface> processor = new TestService.Processor<TestService.Iface>(
new TestServiceImpl());
Args args = new Args(serverTransport)
.processor(processor)
.transportFactory(transportFactory)
.protocolFactory(protocolFactory);
TServer server = new THsHaServer(args);
System.out.println("开启thrift服务器,监听端口:9090");
server.serve();
} catch (TTransportException e) {
e.printStackTrace();
}
}
}
Client 端1
2
3
4
5
6
7
8
9
10
11
12
13
14
15
16
17
18
19
20
21
22
23
24
25
26
27
28
29
30
31
32
33
34
35
36
37
38public class ThriftClient {
public static void main(String[] args) {
try {
TProtocolFactory protocolFactory = new TBinaryProtocol.Factory();
TAsyncClientManager clientManager = new TAsyncClientManager();
TNonblockingSocket transport = new TNonblockingSocket("localhost", 9090);
TestService.AsyncClient client = new TestService.AsyncClient(protocolFactory, clientManager, transport);
Test test = new Test();
test.setBool_(true);
test.setI8_((byte) 1);
test.setI16_((short) 2);
test.setI32_(3);
test.setI64_(4L);
test.setDouble_(5.0);
test.setString_("abc");
test.setBinary_("abc".getBytes());
CountDownLatch latch = new CountDownLatch(1);
client.getBool(test, new AsynCallback(latch));
boolean wait;
try {
wait = latch.await(1, TimeUnit.SECONDS);
System.out.println("latch.await =:" + wait);
} catch (InterruptedException e) {
e.printStackTrace();
}
transport.close();
} catch (IOException e) {
e.printStackTrace();
} catch (TException e) {
e.printStackTrace();
}
}
}
异步处理类:1
2
3
4
5
6
7
8
9
10
11
12
13
14
15
16
17
18
19
20
21
22
23
24class AsynCallback implements AsyncMethodCallback<Boolean>{
private CountDownLatch latch;
public AsynCallback(CountDownLatch latch) {
this.latch = latch;
}
public void onComplete(Boolean response) {
System.out.println("onComplete");
try {
// Thread.sleep(1000L * 1);
System.out.println("AsynCall result =:" + response);
} catch (Exception e) {
e.printStackTrace();
} finally {
latch.countDown();
}
}
public void onError(Exception exception) {
System.out.println("onError :" + exception.getMessage());
latch.countDown();
}
}
运行结果:
Client端:
Received 0
onComplete
AsynCall result =:true
latch.await =:true
Server端:
开启thrift服务器,监听端口:9090
TestServiceImpl.getBool() + true
TThreadPoolServer模式采用阻塞socket方式工作,,主线程负责阻塞式监听“监听socket”中是否有新socket到来,业务处理交由一个线程池来处理,如下图所示:
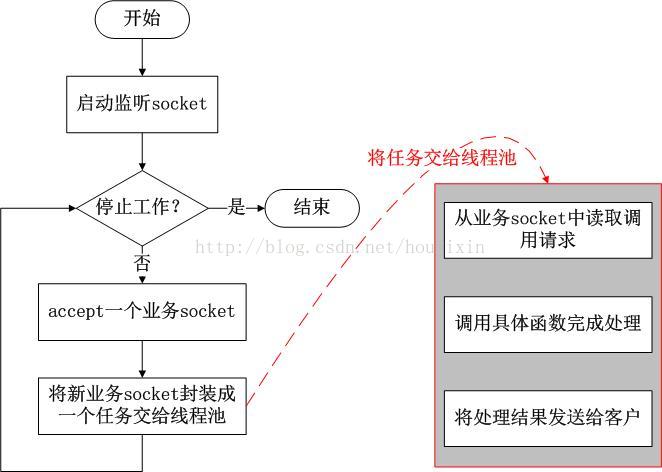
线程池模式中,数据读取和业务处理都交由线程池完成,主线程只负责监听新连接,因此在并发量较大时新连接也能够被及时接受。线程池模式比较适合服务器端能预知最多有多少个客户端并发的情况,这时每个请求都能被业务线程池及时处理,性能也非常高。
线程池模式的处理能力受限于线程池的工作能力,当并发请求数大于线程池中的线程数时,新请求也只能排队等待。
Server端:1
2
3
4
5
6
7
8
9
10
11
12
13
14
15
16
17
18public ThriftServer {
public static void main(String[] args) {
try {
TServerSocket serverTransport = new TServerSocket(9090);
Factory protocolFactory = new TBinaryProtocol.Factory();
Processor<TestService.Iface> processor = new TestService.Processor<TestService.Iface>(new TestServiceImpl());
TThreadPoolServer.Args args = new TThreadPoolServer.Args(serverTransport)
.protocolFactory(protocolFactory)
.processor(processor)
.minWorkerThreads(1000).maxWorkerThreads(1000);
TServer server = new TThreadPoolServer(args);
System.out.println("开启thrift服务器,监听端口:9090");
server.serve();
} catch (TTransportException e) {
e.printStackTrace();
}
}
}
Client端:1
2
3
4
5
6
7
8
9
10
11
12
13
14
15
16
17
18
19
20
21
22
23
24
25
26
27
28
29
30
31
32
33
34
35
36
37
38public ThriftClient {
public static void main(String[] args) {
try {
// 设置调用的服务地址-端口
TTransport transport = new TSocket("localhost", 9090);
// 使用二进制协议
TProtocol protocol = new TBinaryProtocol(transport);
// 使用的接口
TestService.Client client = new TestService.Client(protocol);
// 打开socket
transport.open();
Test test = new Test();
test.setBool_(true);
test.setI8_((byte) 1);
test.setI16_((short) 2);
test.setI32_(3);
test.setI64_(4L);
test.setDouble_(5.0);
test.setString_("abc");
test.setBinary_("abc".getBytes());
System.out.println("Client getBool()" + client.getBool(test));
System.out.println("Client getI8()" + client.getI8(test));
System.out.println("Client getI16()" + client.getI16(test));
System.out.println("Client getI32()" + client.getI32(test));
System.out.println("Client getI64()" + client.getI64(test));
System.out.println("Client getDouble()" + client.getDouble(test));
System.out.println("Client getString()" + client.getString(test));
System.out.println("Client getBinary()" + client.getBinary(test));
transport.close();
} catch (TTransportException e) {
e.printStackTrace();
} catch (TException te) {
te.printStackTrace();
}
}
}
运行结果:
Client端:
Received 1
Client getBool()true
Received 2
Client getI8()1
Received 3
Client getI16()2
Received 4
Client getI32()3
Received 5
Client getI64()4
Received 6
Client getDouble()5.0
Received 7
Client getString()abc
Received 8
Client getBinary()java.nio.HeapByteBuffer[pos=0 lim=3 cap=3]
Server端:
开启thrift服务器,监听端口:9090
TestServiceImpl.getBool() + true
TestServiceImpl.getI8() + 1
TestServiceImpl.getI16() + 2
TestServiceImpl.getI32() + 3
TestServiceImpl.getI64() + 4
TestServiceImpl.getDouble() + 5.0
TestServiceImpl.getString() + abc
TestServiceImpl.getBinary() + java.nio.HeapByteBuffer[pos=0 lim=3 cap=3]
TThreadedSelectorServer模式是目前Thrift提供的最高级的模式,它内部有如果几个部分构成:
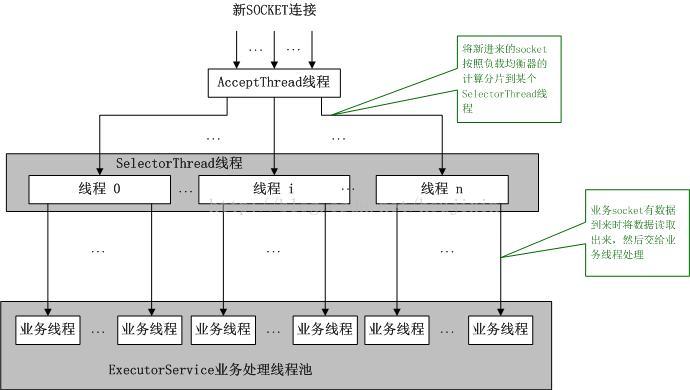
如上图所示,TThreadedSelectorServer模式中有一个专门的线程AcceptThread用于处理新连接请求,因此能够及时响应大量并发连接请求;另外它将网络I/O操作分散到多个SelectorThread线程中来完成,因此能够快速对网络I/O进行读写操作,能够很好地应对网络I/O较多的情况;TThreadedSelectorServer对于大部分应用场景性能都不会差,因此,如果实在不知道选择哪种工作模式,使用TThreadedSelectorServer就可以。
Server端:1
2
3
4
5
6
7
8
9
10
11
12
13
14
15
16
17
18
19
20public class ThriftServer {
public static void main(String[] args) {
try {
// 设置服务器端口
TNonblockingServerSocket serverTransport = new TNonblockingServerSocket(9090);
// 设置二进制协议工厂
Factory protocolFactory = new TBinaryProtocol.Factory();
// 处理器关联业务实现
Processor<TestService.Iface> processor = new TestService.Processor<TestService.Iface>(new TestServiceImpl());
TThreadedSelectorServer.Args args = new TThreadedSelectorServer.Args(serverTransport);
args.processor(processor);
args.protocolFactory(protocolFactory);
TServer server = new TThreadedSelectorServer(args);
System.out.println("开启thrift服务器,监听端口:9090");
server.serve();
} catch (TTransportException e) {
e.printStackTrace();
}
}
}
Client端:1
2
3
4
5
6
7
8
9
10
11
12
13
14
15
16
17
18
19
20
21
22
23
24
25
26
27
28
29
30
31
32
33
34
35
36
37
38public class ThriftClient {
public static void main(String[] args) {
try {
TProtocolFactory protocolFactory = new TBinaryProtocol.Factory();
TAsyncClientManager clientManager = new TAsyncClientManager();
TNonblockingSocket transport = new TNonblockingSocket("localhost", 9090);
TestService.AsyncClient client = new TestService.AsyncClient(protocolFactory, clientManager, transport);
Test test = new Test();
test.setBool_(true);
test.setI8_((byte) 1);
test.setI16_((short) 2);
test.setI32_(3);
test.setI64_(4L);
test.setDouble_(5.0);
test.setString_("abc");
test.setBinary_("abc".getBytes());
CountDownLatch latch = new CountDownLatch(1);
client.getBool(test, new AsynCallback(latch));
boolean wait;
try {
wait = latch.await(1, TimeUnit.SECONDS);
System.out.println("latch.await =:" + wait);
} catch (InterruptedException e) {
e.printStackTrace();
}
transport.close();
} catch (IOException e) {
e.printStackTrace();
} catch (TException e) {
e.printStackTrace();
}
}
}
异步处理类:1
2
3
4
5
6
7
8
9
10
11
12
13
14
15
16
17
18
19
20
21
22
23
24class AsynCallback implements AsyncMethodCallback<Boolean>{
private CountDownLatch latch;
public AsynCallback(CountDownLatch latch) {
this.latch = latch;
}
public void onComplete(Boolean response) {
System.out.println("onComplete");
try {
// Thread.sleep(1000L * 1);
System.out.println("AsynCall result =:" + response);
} catch (Exception e) {
e.printStackTrace();
} finally {
latch.countDown();
}
}
public void onError(Exception exception) {
System.out.println("onError :" + exception.getMessage());
latch.countDown();
}
}
运行结果:
Client端:
Received 0
onComplete
AsynCall result =:true
latch.await =:true
Server端:
开启thrift服务器,监听端口:9090
TestServiceImpl.getBool() + true
上面代码接口的编写:
testService.thrift
1 | struct Test { |
个人博客原文:Thrift 简单例子
摘要:本文简单的举了个例子,怎么用Thrift去实现一个RPC调用。
HelloService.thrift
1 | namespace java com.thrift.demo.service |
运行下面命令,生成HelloService.java类
1 | thrift-0.10.0 -gen java HelloService.thrift |
生成的HelloService.java内容如下:
1 | package com.thrift.demo01.service; |
1 | public class HelloServiceImpl implements HelloService.Iface { |
1 | public class ThriftServer { |
1 | public class ThriftClient { |
先运行Server端,再运行Client端
服务端输出:
开启thrift服务器,监听端口:9090
say boolean :true
say string :Hello world
say int :20141111
say void …
到这里,就实现了一个Thrift的RPC调用例子