摘要:本文简单介绍 Angular 的响应式表单,还是以之前的评论模块为例
介绍
Angular 总共提供了 3 中表单实现方式,分别是:Template-driven Forms (模板驱动表单)、 Reactive Forms (响应式表单)、Dynamic Forms (动态表单)。本文只介绍响应式表单。
响应式表单是什么呢?其实跟我们以前用 JQuery 或者其他框架实现的思路差不多,就是使用 HTML 显示数据,然后通过定义一定的校验器、校验规则以及校验提示语,通过事件触发校验后校验不通过的显示提示语,只不过用了 Angular,我们就使用 Angular 提供的语法来实现这个校验过程。
使用
接下来我们通过代码例子来介绍如何使用响应式表单。
引入响应式表单模块
在我们要使用响应式表单的那个模块里面引入响应式表单模块,比如我们在文章模块中使用响应式表单,我们就要在 imports 中添加 ReactiveFormsModule。代码如下1
2
3
4
5
6
7
8
9
10
11
12
13
14
15
16
17
18
19
20
21@NgModule({
imports: [
RouterModule,
RouterModule.forChild(articleRoutes),
SharedModule,
ReactiveFormsModule,
NgbModule.forRoot()
],
declarations: [
HomeComponent,
DetailComponent,
CommentComponent,
CommentViewComponent
],
providers: [
HomeService,
DetailService,
CommentService
]
})
export class ArticleModule { }
编写校验器代码
首先我们这里的表单有 3 个字段,分别是 nickname、email、content; nickname 添加必填校验器,email 添加必填和邮箱格式校验器,content添加必填校验器。
首先在 CommentComponent 中注入 FormBuilder 对象,并添加 commentForm 表单组以及创建一个评论对象 comment。1
2
3
4public commentForm: FormGroup;
public comment: Comment = new Comment();
constructor(private formBuilder: FormBuilder){}
定义校验器的提示语 validationMessages, formErrors 是在模板中显示的提示语,提示语来自 validationMessages1
2
3
4
5
6
7
8
9
10
11
12
13
14
15
16
17
18
19public formErrors = {
"nickname": "",
"email": "",
"content": "",
"formError": ""
}
public validationMessages = {
"nickname": {
"required": "昵称不能为空",
},
"email": {
"required": "邮箱不能为空",
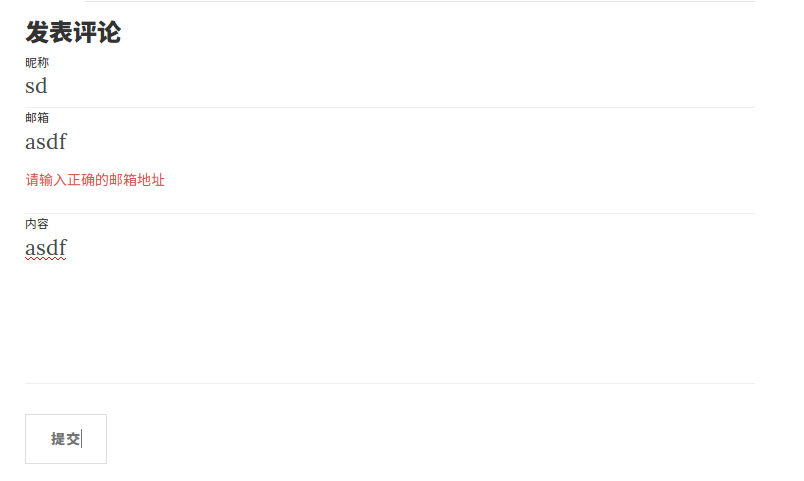
"pattern": "请输入正确的邮箱地址"
},
"content": {
"required": "内容不能为空"
}
}
在组件启动的函数中构造表单,这时候为每个字段添加了校验器,并且绑定在什么时候触发校验,这里我们在每个值改变的时候触发。1
2
3
4
5
6
7
8
9
10
11
12
13
14
15
16
17
18
19
20
21
22
23
24
25
26
27
28
29ngOnInit(): void {
this.buildForm();
}
private buildForm() {
this.commentForm = this.formBuilder.group({
"nickname":[
this.comment.nickname,
[
Validators.required
]
],
"email": [
this.comment.email,
[
Validators.required,
Validators.pattern("^([a-zA-Z0-9_-])+@([a-zA-Z0-9_-])+((\.[a-zA-Z0-9_-]{2,3}){1,2})$")
]
],
"content": [
this.comment.content,
[
Validators.required
]
]
});
this.commentForm.valueChanges.subscribe(data => this.onValueChanged(data));
this.onValueChanged();
}
onValueChanged() 方法实现了判断是那个字段校验不通过,然后将该字段的 validationMessages 提示语赋值给 formErrors,在模板那里有判断如果 formErrors.email 等等字段不为空则显示改内容,也即是校验器的提示语1
2
3
4
5
6
7
8
9
10
11
12
13
14
15
16
17onValueChanged(data?: any) {
if (!this.commentForm) {
return;
}
const form = this.commentForm;
for (const field in this.formErrors) {
this.formErrors[field] = '';
const control = form.get(field);
if (control && control.dirty && !control.valid) {
const messages = this.validationMessages[field];
for (const key in control.errors) {
this.formErrors[field] += messages[key] + ' ';
}
}
}
}
HTML 模板代码
我们要关注的是 [formGroup]=”commentForm”、novalidate、formControlName=”nickname”、以及 *ngIf=”formErrors.nickname” 这几个点,并不是指具体的点,而是着重看这些语法的每一个地方,在你自己实现的时候需要根据你的代码修改的。
还有一个是 (ngSubmit)=”sendComment()” 定义了该表单点击提交时调用的函数。
1 | <form [formGroup]="commentForm" (ngSubmit)="sendComment()" role="form" novalidate> |
GitHub 代码
James-Blog 中的 comment.component.ts 文件
参考文章
效果图
